


Armada Pro800D Wire and Valve Locator for Sprinkler and Irrigation Testing - New Review
 Greetings. In this post I’m going to take a look at the Armada Pro800D, detailing its many features and giving you a brief recap of my hands on time using the locator in the field. The Pro800D’s transmitter is built in to the rugged carrying case so you don’t have to worry about lugging around any extra equipment.
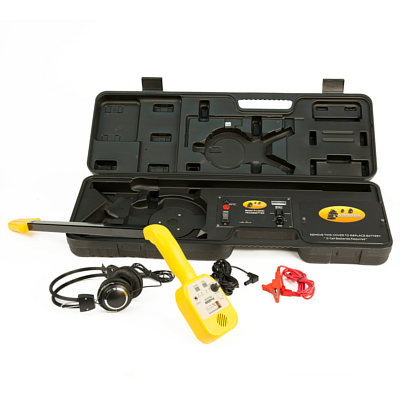
This is super convenient and the whole unit weighs less than you would expect when you pick up the case. When you do get it out to the job site you just pop the case open and hook up your leads.
The leads are color coded and simple enough to set up. The red lead connects to the wire you’re looking to trace and the black lead connects to the ground stake that you want to ground in soil. You shouldn’t ever attach to an electrical ground or a pipe or what have you.
Always go for the soil to decrease the risk of possible accident or injury. After you have your leads hooked up to the wire you want to trace and the ground, you can power on both units (transmitter and locator wand) and get tracing.
Now I’ll get to my hands on time with the locator so that I can explain the next operational steps with a real world application. We were working on a residential sprinkler line, tracing from the breaker to a valve. The Armada Pro800D offers two tracing functions: peak and null. Essentially the peak mode makes the tone louder as you approach the wire with the signal on it and the null feature makes the signal louder as you move away from the wire with the signal on it.
So you probably want to start in peak mode to get an idea of the general location of the wire but as you get directly over it, the high gain, even when turned down a lot, can make it difficult to be exact in your location. So once you have the location within a half a foot on either side, switch over to null mode which will cut out the tone completely when you are over the wire.
If you move the wand side to side the tone will come back. This allows you to pinpoint the wire by keeping the locator in this zone in which the tone disappears. We used the null mode to follow the wire into the backyard and eventually to the valve box with the malfunctioning valve.
We could visually see which valve we were looking for among the three in the box, but in the event that you cannot, a smaller tone probe or valve chatterbox is useful at this point. (Check out the Armada Pro48K for this application.)
That’s it - pretty simple, cut and dried. There is an art to if for sure, and some trial and error, but once you get the hang of it, locating with the Armada Pro800D is a snap.
See you next week.
Add new comment